Sunday, July 29, 2012

Dystopian HOTT

Kingdom of Britannia Skycarrier
Spartan Games produce some really nice models for their game Dystopian Wars. This is a game set in a steampunk Victorian-esque world with giant tank, robots and flying machines. It uses the same basic mechanics as their Uncharted Seas and Firestorm Armada rules with some added tweaks for things like little fighter planes and such. Unfortunately after seeing the game played a couple of times I really didn't have any interest in it.


I have pondered for a while though, what to do with the models. Hordes of the Things was the obviously answers. Most things can be done with Hordes of the Things. It is a truth universally accepted.

Terrier Light Tanks
It was Owen of Fighting Fantasist who gave the motivation/ inspiration to get going. He had pretty much the same feeling about the Dystopian Wars rules. After much discussion we had thrashed out some ideas for HOTT. Some things were obvious. The big giant robots and huge cathedral like tanks were going to be behemoths. The helicarriers and zeppelins were airboats. The discussion came over the little flyers which come with some of the models. The depict two little places on a 20mm x 20mm base. As we were going to use a 60mm HOTT frontage we realised that you could put two of these flyer tokens on a 60 x 40 HOTT base and class them as hordes. They could then easily represent wave after wave of fighter aircraft. Bombers could then be easily classed as flyers in HOTT terms.

Owen went crazy. He has an airboat general and 21 elements of fighters to represent his Sky Pirates.
Bulldog Medium Tank

I started with the Kingdom of Britannia. The have a tank with a cathedral on the top and and flying aircraft carrier that looks like a SHIELD Helicarrier. SOLD!


Painted I currently have 36AP of elements of which two can be classed as the general.

HMLS Thunderchild
1 x Behemoth (HMLS Thunderchild)
1 x Airboat (The Skycarrier - which does need a name)
6 x Knights (Bulldog Medium Tanks)
3 x Artillery (Boudicca Artillery)
4 x Riders (Terrier Light Tanks)

On the workbench are three elements of hordes (Fighters), 3 flyers (Bombers) and the Stronghold (the Kingdom of Britannia bunker complex)

I also have a 'desert raider' style force made up of riders and scout airships, and the tanks and infantry for The People's Soviet of Philtopia. The latter are actually Brigade Models land ironclads and Peter Pig 3mm infantry.

I also want to get some of the Dystopian Wars terrain as the little buildings they do will be ideal.

There are more pictures on my Flickr photostream.

For Queen and Country!

Monday, July 9, 2012

Small, Far Away

Not A Knight.
I was performing one of my daily tasks, browsing over Tabletop Gaming News, and I saw an article which led me to this.

"Hullo", says I, "This looks familiar!"


Three Age Studios are producing a 30mm scale giant stompy robot. For those long time gamers, cast you failing memories back to 1994 and a Games Workshop product called Titan Legions.


A GW Knight
Look familiar?

I wonder how long it will be before the lawyers step in...


The GW Knight is courtesy of Kaptain Kobold and his awesome Flickr photostream.


Sunday, July 1, 2012

How I Paint

I recently painted some WW2 figures as a commission for my father. Before I'd even put paint to figure I had the idea of doing a blog post about how I go about painting figures. I'm not saying my way is the right way or anything. There is no right way. I do however get asked how I go about how I achieve a particular effect. In all honesty I don't do anything special as you are about to read.

This is a step by step guide using a humble Late War British infantryman from Crusader Miniatures. Although I only show the one figure I actually painted 27 of them. One of the things I do when I have to paint a number of figures the same is to paint one comeplety to get a feel for the right colours and what order to apply them. Once I've done this and got a better 'feel' of the figures in hand, I find I can quickly paint the rest.

I paint figures now with the Vallejo range. I will list each paint used where necessary. I didn't use any mixing.

Step 1 - Undercoat

Undercoat
After any mould lines and flash were cleaned from the figure I stuck it onto a 20mm round plastic base. I then used milliput to smooth out the lip of the base of the figure. The whole thing was then sprayed using Flames of War War Paint German Armour. I use a variety of colours for undercoating depending on what I'm painting.


Step 2 - Basecoat

The areas on the figure were painted using the following colours.

Uniform and Webbing
Uniform and Webbing

Tunic - British Uniform
Gaiters and webbing - Khaki


Finished Basecoat
Helmet - Russian Uniform
Flesh - Dark Flash
Leaves on helmet - Intermediate Green
Boots - Black Grey
Metalwork on the rifle and bayonet - Gunmetal Grey
Woodwork on the rifle and pistols - Flat Brown
Chinstrap - Flat Earth


Step 3 - Wash

The rifle and metalwork areas were given a wash of Badab Black wash while the rest of the figure was given a wash of Devlan Mud, both from Games Workshop. They no longer make this wash as they have changed suppliers. However Army Painter appear to make washes which are exactlty the same.


Step 4 - Highlighting and Details

The uniform was drybrushed in Russian Uniform while the metal on the rifle was highlighted using Natural Steel. The the nose and cheeks were given a line of Dark Flesh just to make them stand out.

Eyes. I always try and paint figure with masks so I don't have to paint eyes. Unfortunately I couldn't do it in this case. All I do is use a small brush, 3/0, a paint a small dot of white into the eye socket and then when that is dry a small dot of black. Occasionally I have to touch up the face with bit of Dark Flash.

Step 6 - Basing

The finished figure with one of his mates.
The base was painted in Leather Brown from Miniature Paints. When that was dry I mixed a few drop of water into some PVA glue and applied some sand like basing material bought from my local railway modelling shop. I didn't cover the whole base with it as I wanted to use two types of basing. When the first part was dry I mixed some more water into PVA and went over the sand. This seals it in and stops it falling off the base. I then covered the rest of the base with some static grass, which I've had for so long I'm not sure where it came from.

Step 7 - Varnishing
When the glue on the base was dry, I left it overnight to be sure, I sprayed the figure using Army Painter matt varnish.

And that is it. Nothing complicated and yet I think you get a nice looking figure and my dad was certainly happy with the job.

This figure along with all of his chums can be seen on my Flickr photostream here.

Tuesday, June 26, 2012

Hordes of the Things - A Quickie

I play Hordes of the Things. I will go into this in a post later.

If you are part of the 21st Century and on The Facebook and have played Hordes of the Things or are interested go and like it! Go on!

Also check out The Stronghold Rebuilt written by the Godfather of HOTT himself, Kaptain Kobold.

Sunday, June 10, 2012

Pop That Chap Someone!


Late War British Officers
The Brits are going to war!

At least some of them are. I've recently finished a painting commission to paint some Late War British WW2 figures. They are all from Crusader Miniatures and were really nice to paint. All the castings and details were crisp and the Vallejo paint went on a treat.

They were actually a commission for my father who has, like many at The October Wargames club, become interested in a set of wargames rules called Operation Squad by Massimo Torriani and Valentino Del Castello. As you can tell from their names these are Italian chaps and they have put together are really nice, simple set of World War Two rules for games at a squad level.

Rather than an I-Go-You-Go system it uses a reaction based system and the turn sequence goes as follows:

1) Inititive. Each player rolls two six sided and adds the Tactical Value of their highest figure. The Tactical Value is the general ability level of the figure. Average troops have a Tactical Value of 3 while as more elite troops such as commandos and paratroopers have a Tactical Value of 4. The winner can choose to move first or second. The person who goes first has the initiative (Player A).
2) Action Sequence:
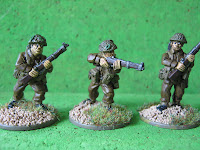
Late War British Riflemen
  • Player A selects one of his men and declares his intentions - Move and Fire, Fire, Reload, Move Carefully, Run are just some of the actions a figure can perform. If moving you declare where the figure is moving to.
  • Player B can now react. He declares the intentions for one of his men in a similar way.
Once each player as declared intentions for three figures, the players roll 2D6 and add the Tactical Value for each figure acting. Actions are then performed from the highest to the lowest.
The sequence then begins again starting with Player B declaring the action for one of his figures.

This is them repeated until all figures have acted, at which point a new turn begins.

The sequence is a bit more in depth than this but hopefully this conveys the gist of it.

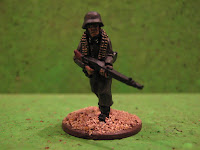
German Grenadier with MG42 LMG
Combat is simple. When declaring a Fire or Move and Fire action you pick a target, then measure the range. The shooting players rolls 3D6 adding any dice for range modifiers (for a Lee Enfield rifle at upto 40 cm add 1D6, for an MP40 at up to 20cm add 2D6). The shooter also adds the figures Tactical Value. The defender rolls a number of D6 depending on the situation. For example if the target figure is in woods he rolls 2D6 as a cover bonus, if the target figure also ran in its previous action add another D6.

The dice are then rolled. The defenders total is subtracted from the attackers total. If the result is 11-13 the target is pinned, 14-15 the target is wounded and 16 or more KIA.

And that is the basics of the system.

The basic rulebook has three lists each for the American, British, Germans and Russians and all are based around a single squad with options. On average you will play with about 10 figures in a game. There are also six scenarios from a recon mission to capturing documents from an abandoned vehicle in the middle of the table.

There are also two expansion books - Vehicles (which adds vehicles and new lists) and Reinforcements (which adds some more vehicles, lists and scenarios). I've not played with any of the material out of these books so I can't comment on how they play.

Sunday, June 3, 2012

Terrain

I have a love/ hate thing with terrain.

A wargames table with excellent terrain is a truly inspiring sight. It inspires me to go home and make terrain.

Unfortunately I hate making it. It's not as much fun as painting figures.

Or so I thought.

Earlier this year 4Ground started releasing terrain pieces to trade and my FLGS was selling it. I bought a house, then some walls, then some more walls. A third pack of walls followed. That was all in one hour.

Roman Limes Watch Tower
4Ground produce really nice laser cut MDF buildings and terrain pieces for lazy buggers like me who can't be bothered to make it. They come in sheets which you just pop out and slot or glue together. You can leave them bear wood or paint them and they take paint really well.

My favourite piece is the Roman Limes Watch Tower. It works with my Early Imperial Roman army for DBA or Hordes of the Things. It also fits in with Warmachine and Hordes terrain. £20.00 well spent.


Wall Sections

The walls are just brilliant. With three packs I need never buy any more. They come in different lengths and the gaps in the bases allow the end of one wall to be butted against another section at right angles.

I also have six of their Timber Framed Cottages. They are nicely generic and have so far featured in Warmachine games and also on the battlefields of Northern France in 1944.

When I was putting the wooden pallisade together the other week I didn't realise how quick and easy it would be. Work is in process to build some hedges using the balsa wood, milliput and cocktail sticks in a similar way.

So, in summary, terrain needn't be a chore. Unless of course I want to do a Stalingrad themed table. One step at a time I think...

Monday, May 28, 2012

UK Games Expo 2012

This weekend saw the annual UK Games Expo at the Clarendon Suite here in a very sunny Birmingham. I go every year as it is right on my doorstep.

Over the last couple of years it has become much more of a family orientated board game event rather than a show where manufacturers of lead figures ply there wares. I don't have any problem with this. I enjoy wandering around looking at the new games, meeting friends and just having a bloody good laugh.

I always frequent the bring and buy stand though. There is always a bargain to be had and this year was no exception.

I picked up the following:

Team Yankee by Games Designers Workshop. £10.00
Air Cav by West End Games. I nearly bought this at Spirit Games in Burton two weeks ago for £12.00. I'm glad I didn't as it only cost me a fiver.
Harpoon: Captains Edition by Games Designers Workshop for £10.00
Top Gun by FASA for £10.00
Ogre Miniatures rules by Steve Jackson Games for £2.00. I gave this to my mate Owen of http://fightingfantasist.blogspot.co.uk/  He cried tears of joy for the reasons explained here.

From another couple of stands I got hold of most of the 1st Edition Warmachine and Hordes books which I wanted for the background fluff. Ebay should be able to supply the rest.

I also picked up for £9.00 Star Cruiser by Games Designers Workshop. This is the starship combat game for 2300AD. There was, upon closer inspection when I got home, a problem in that the counters were missing. This is not a problem as I have PDFs of all of the 2300AD products including the counter sheet. As a bonus though the box did contain the Ships of the French Arm Sourcebook.

Overall a great show and a great weekend. And there were girls there.